[ubuntu 22.04 server] wifi 수정하기(feat. rpi4)
무선인터넷 이름을 확인 합니다.
$ ls /sys/class/net
eth0 lo wlan0
netplan 폴더에 어떤 이름으로 파일이 저장되어 있는지 확인합니다.
$ ls /etc/netplan/

50-cloud-init.yaml 파일을 수정합니다.
$ sudo nano /etc/netplan/50-cloud-init.yaml
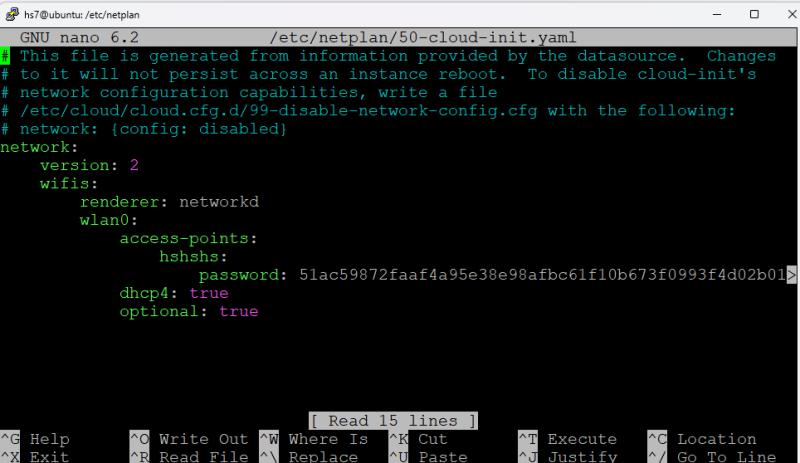
아래와 같이 수정합니다.
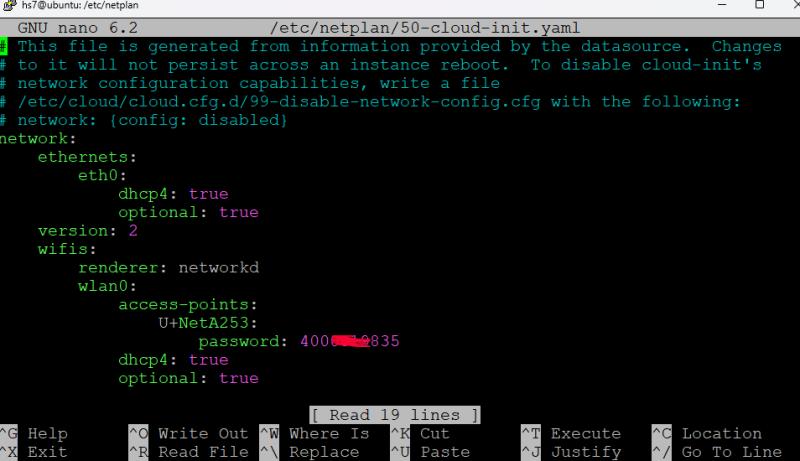
수정을 했으면, 적용합니다.
$ sudo netplan apply
또는
$ sudo netplan --debug apply
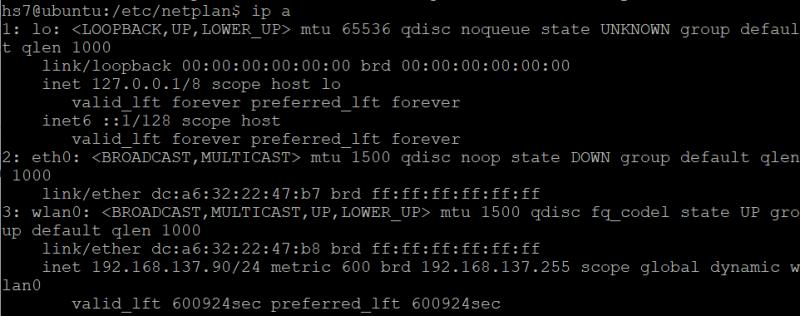
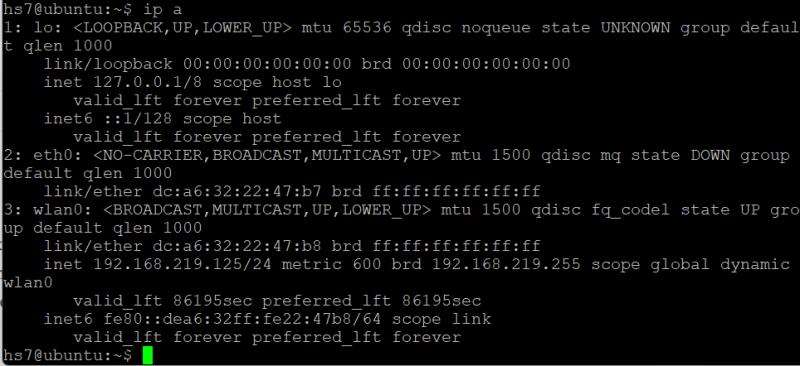
정상적으로 되었는지 확인해 봅니다.
$ ip a
변경전 $ ip a 화면
변경 후 $ ip a 화면
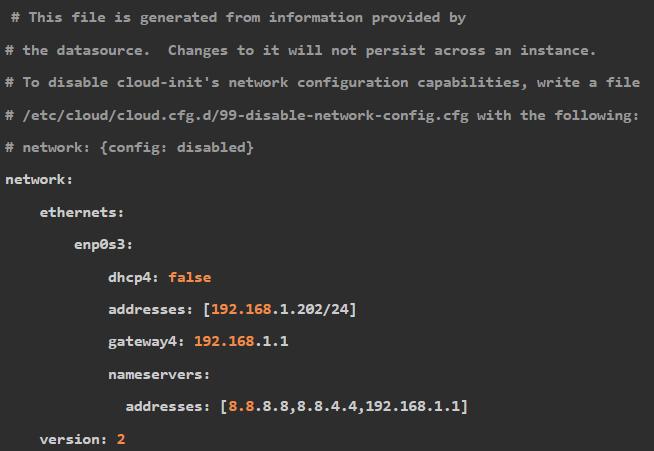
*** 고정 ip 세팅
*** 다중 엑세스포인트 설정 : 라즈베리파이4 를 여러군데서 사용할 경우가 있습니다.
이때, 엑세스 포인트를 미리 저장할 수 있습니다.
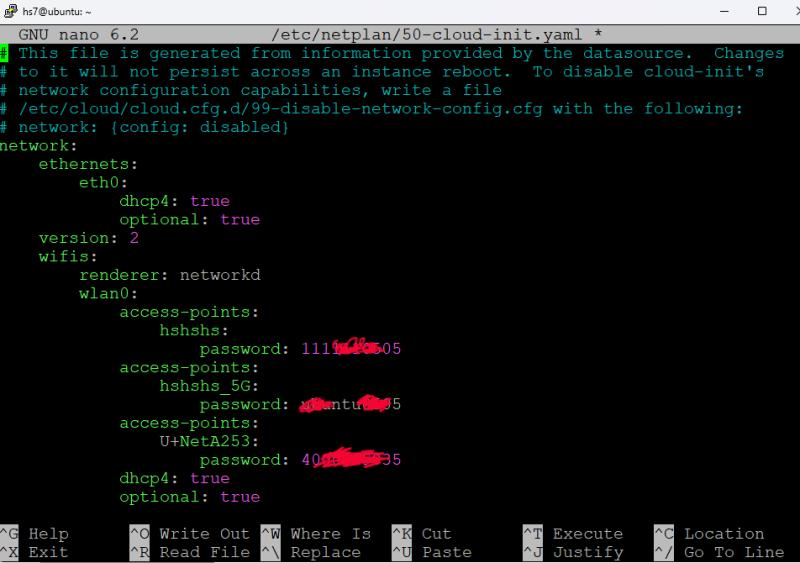
# This file is generated from information provided by the datasource. Changes
# to it will not persist across an instance reboot. To disable cloud-init's
# network configuration capabilities, write a file
# /etc/cloud/cloud.cfg.d/99-disable-network-config.cfg with the following:
# network: {config: disabled}
network:
ethernets:
eth0:
dhcp4: true
optional: true
version: 2
wifis:
renderer: networkd
wlan0:
access-points:
hshshs:
password: 111*****333
access-points:
hshshs_5G:
password: ubu****998
access-points:
U+NetA253:
password: 400**19835
dhcp4: true
optional: true
*** 일부 고정ip 로 세팅할 경우,
# This file is generated from information provided by the datasource. Changes
# to it will not persist across an instance reboot. To disable cloud-init's
# network configuration capabilities, write a file
# /etc/cloud/cloud.cfg.d/99-disable-network-config.cfg with the following:
# network: {config: disabled}
network:
ethernets:
eth0:
dhcp4: true
optional: true
version: 2
wifis:
renderer: networkd
wlan0:
access-points:
hshshs:
password: 111*****333
access-points:
hshshs_5G:
password: ubu****998
dhcp4: true
optional: truewlan0:
access-points:
U+NetA253:
password: 400**19835dhcp4: no
addresses: [192.168.219.125/20]
gateway4: 192.168.219.1
nameservers:
addresses: [8.8.8.8,8.8.8.4]optional: true
*****위 문법 잘못되었습니다. 작동되지 않아서, 고생 했습니다. (다른 rpi4 에 연결해서, netplan 파일 수정했습니다.)
*** ubuntu 22.04 에서 문법이 변경되었다고 합니다.
network:
version: 2
wifis:
renderer: networkd
wlan0:
access-points:
U+NetA253:
password: 400**19835
dhcp4: false
addresses:
- 192.168.219.125/24
routes:
- to: default
via: 192.168.219.1
nameservers:
addresses: [1.214.68.2,61.41.153.2]
- gateway4 대신에 routes 를 사용한다고 합니다.
- 작동 잘 됩니다. (고정 IP)
- 네임서버는 LG 유플러스 사용중이라 위와 같이 했습니다. 구글 네임서버 설정시, 잘 안되네요.
**추가 (2023.10)
- 네임서버를 사용하지 않아도 작동되서, 제외 시켰습니다.
- adguard를 사용해서, 무조건 고정ip 로 해야 했습니다. 여러개 엑세스포인트중에서 선택합니다.
# adguard를 사용하게 되니까, 고정ip가 편합니다.
# 아래 다중 wifi 접속 + 고정IP 세팅입니다.
network:
ethernets:
eth0:
dhcp4: true
optional: true
version: 2
wifis:
renderer: networkd
wlan0:
access-points:
hssssshshs:
password: 111****05
dhcp4: false
addresses:
- 192.168.137.125/24
routes:
- to: default
via: 192.168.137.1
###
access-points:
hsssshshs_5G:
password: kb******05
dhcp4: false
addresses:
- 192.168.0.125/24
routes:
- to: default
via: 192.168.0.1
###
access-points:
U+NetA***3:
password: 40000**835
dhcp4: false
addresses:
- 192.168.219.125/24
routes:
- to: default
via: 192.168.219.1###
access-points:
HaaaaaS_5G:
password: 111*****05
dhcp4: false
addresses:
- 192.168.31.125/24routes:
- to: default
via: 192.168.31.100
**추가 (2023년11월)
- 위 고정ip 세팅은 잘 작동됩니다.
- 다만, 중요한 문제를 안고 있었습니다.
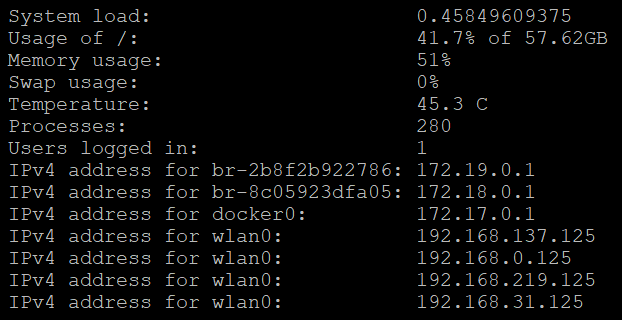
로그인 하면, 아래와 같이 wlan0 이 4개나 보입니다.
이로 인해서, 공유기와 통신에 문제가 생겼습니다. 외부접속이 되지 않았습니다.
- 해결책은
1. 고정ip는 한개만 사용하거나,
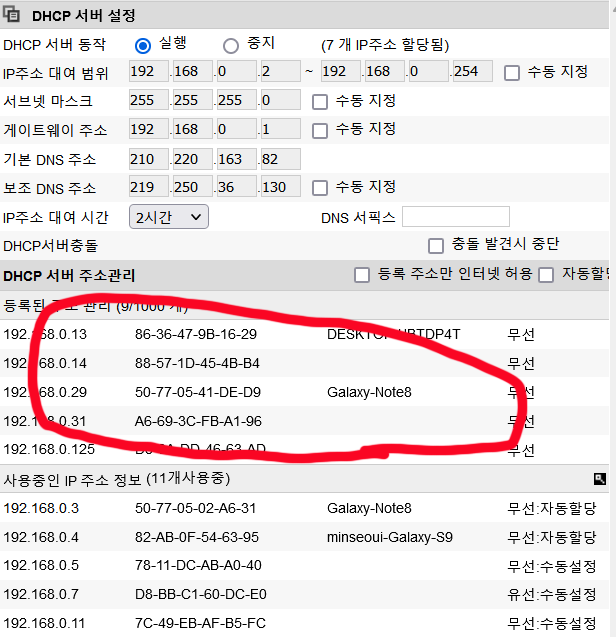
2. 초기 방식처럼 dhcp 를 이용하고, 공유기에서 ip를 고정화 시킬 수 있습니다.
iptime 기준으로 아래와 같이 dhcp 서버설정에서 등록해 주면, 고정ip 처럼 사용가능하다고 합니다.
결국, 초기 상태인 아래와 같이 세팅했습니다.
network:
ethernets:
eth0:
dhcp4: true
optional: true
version: 2
wifis:
renderer: networkd
wlan0:
access-points:
hshshs:
password: 111***5
access-points:
hshshs_5G:
password: kb***05
access-points:
U+NetA3423:
password: 400***35
access-points:
HS_5G:
password: 111****5
dhcp4: true
optional: true
*** raspberry pi OS 에서 세팅법
sudo nano /etc/wpa_supplicant/wpa_supplicant.conf
아래 내용을 넣어 주면 됩니다.
ctrl_interface=DIR=/var/run/wpa_supplicant GROUP=netdev
update_config=1network={
ssid="hshshs"
psk="111***505"
}
network={
ssid="hshshs_5G"
psk="kbs***05"
}
network={
ssid="U+NetA253"
psk="400**19835"
}
-
- image.png.jpg [File Size: 11.4KB / Download: 93]
- image.png.jpg [File Size: 43.5KB / Download: 87]
- image.png.jpg [File Size: 46.0KB / Download: 85]
- image.png.jpg [File Size: 45.2KB / Download: 86]
- image.png.jpg [File Size: 51.6KB / Download: 86]
- image.png.jpg [File Size: 24.6KB / Download: 108]
- image.png.jpg [File Size: 52.3KB / Download: 100]
- image.png [File Size: 31.7KB / Download: 106]
- image.png [File Size: 64.3KB / Download: 117]